Hosting Ruby on Rails API on Heroku
4 min readJan 1, 2021

1. Create Heroku Account
2. Creat Rails App
rails new my-app --api- cd into my-app
cd my-app3. Create Migration Table and Seed data
rails g resource User name age:integer- Go to seeds.rb file and add this data below
User.create(name: 'Allan', age: 24 )User.create(name: 'Suni', age:26 )User.create(name: 'Jackie', age: 29)

- Run rails db:migrate and db:seed on terminal
rails db:migration
rails db:seed
4. User Controller (Index)
- will be adding a index method in the controller to display all users data. In the users_controller.rb file and add this below
class UsersController < ApplicationController
  def index    @users = User.all    render json: @users  end
end
- To test and see if all this is working run rails s in the terminal and navigate to http://localhost:3000/users
- If you see all Users information you’re in the right direction

5. Configuring app to work with Heroku
- We need to configure the app to work with postgres instead of sqlite3 because thats what Heroku likes. Will do this by moving sqlite3 to development and add production with pg. I made it easier for you so you can copy and paste this in your gemfile.
source 'https://rubygems.org'git_source(:github) { |repo| "https://github.com/#{repo}.git" }ruby '2.6.1'# Bundle edge Rails instead: gem 'rails', github: 'rails/rails'gem 'rails', '~> 6.1.0'# Use sqlite3 as the database for Active Recordgem 'sqlite3', '~> 1.4'# Use Puma as the app servergem 'puma', '~> 5.0'# Build JSON APIs with ease. Read more: https://github.com/rails/jbuilder# gem 'jbuilder', '~> 2.7'# Use Redis adapter to run Action Cable in production# gem 'redis', '~> 4.0'# Use Active Model has_secure_password# gem 'bcrypt', '~> 3.1.7'# Use Active Storage variant# gem 'image_processing', '~> 1.2'# Reduces boot times through caching; required in config/boot.rbgem 'bootsnap', '>= 1.4.4', require: false# Use Rack CORS for handling Cross-Origin Resource Sharing (CORS), making cross-origin AJAX possible# gem 'rack-cors'group :development, :test do# Call 'byebug' anywhere in the code to stop execution and get a debugger consolegem 'byebug', platforms: [:mri, :mingw, :x64_mingw]gem 'sqlite3', '~> 1.4'endgroup :development dogem 'listen', '~> 3.3'# Spring speeds up development by keeping your application running in the background. Read more: https://github.com/rails/springgem 'spring'endgroup :production dogem 'pg'end# Windows does not include zoneinfo files, so bundle the tzinfo-data gemgem 'tzinfo-data', platforms: [:mingw, :mswin, :x64_mingw, :jruby]
- Run bundle install in your terminal to make sure everything works properly.
- Now will be looking into database.yml file and adding this below
production:<<: *defaultdatabase: db/production.sqlite3adapter: postgresql

- Next step for this stage is to go to .gitignore and adding this below at the very end
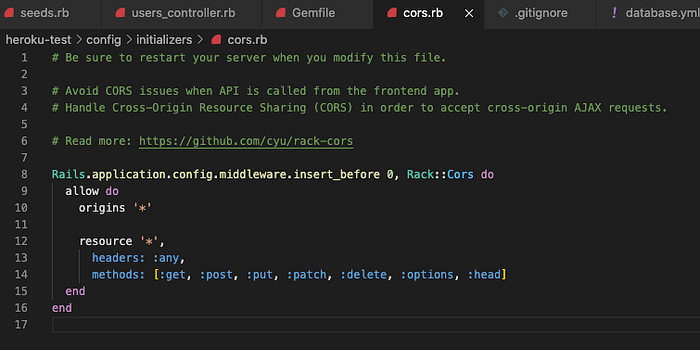
/vendor/bundle- Last step go to your cors.rb file located in the initializer file and copy and past this code below.
# Be sure to restart your server when you modify this file.# Avoid CORS issues when API is called from the frontend app.# Handle Cross-Origin Resource Sharing (CORS) in order to accept cross-origin AJAX requests.# Read more: https://github.com/cyu/rack-corsRails.application.config.middleware.insert_before 0, Rack::Cors doallow doorigins '*'resource '*',headers: :any,methods: [:get, :post, :put, :patch, :delete, :options, :head]endend
6. Push application to Heroku
- On your terminal run these command lines 1 at a time
git add . git commit -m "first commit"heroku create heroku-test03git push heroku masterheroku run rake db:migrateheroku run raik db:seedheroku open
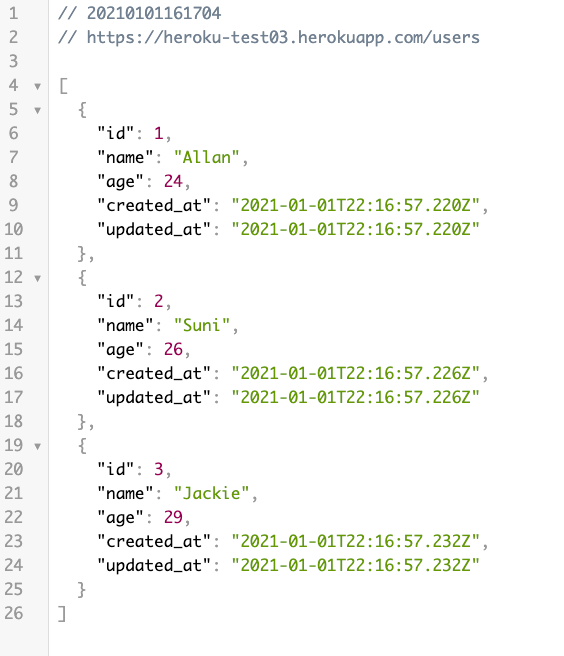
- Depending on what you named your app your url should look something like this https://heroku-test03.herokuapp.com/users . The heroku-test03 is what I named my app so if you name yours my-app8 your url will be https://my-app8.herokuapp.com/users .
Congratulation you have hosted your rails application on Heroku

Thank you for taking the time to read this blog and I hope it was helpful. If you want to check out any more how to blogs check out my recents blogs and follow me to stay up to date. Until next time.
If you want to see a video walk through please check this video out and it will guide you.